
Wednesday, November 23, 2011

TURKEY, TURKEY, TURKEY!!!!

Casey and I have been married for 6 1/2 years and I think he has worked every Thanksgiving since we have been married :(  It's a bummer, but such is the life of a chef.  His favorite holiday also happens to be THANKSGIVING!!  So, every year I make a Thanksgiving meal for our little family at home.  It started with just the 2 of us and its hard to believe next year there will be 6 of us!  I will admit, my first year making a turkey I was sooo intimidated.  I mean, turkeys are hard to cook, you want crispy skin, juicy meat, flavorful and looking good.  I will let you all in on a little turkey secret the restaurants are hiding from you.  When they make big thanksgiving meals many times they cook the breasts and thighs separately so that they can achieve the perfect temperature without drying out the meat and then they present one whole turkey to the table that is golden brown (that will probably not ever be eaten)!!  However, because I have an amazing chef at home, and I have had plenty of practice I have figured out how to make the most delicious moist turkey ever!!

 Ingredients:
Turkey, thawed (mine was about 21 lbs)
3 sprigs thyme
2 sprigs rosemary
3 sprigs sage
4 garlic cloves
1 lemon
1 pound of butter (4 sticks)
Salt and Pepper
Injector

So, first start by take 2 sprigs of thyme, 1 sprig of rosemary, 2 sprigs sage and remove leaves from stems.  Then finely chop.  Next chop garlic, and zest your lemon.  Melt the butter and add in chopped herbs, garlic and lemon zest.  Now use your blender (or a stick blender) to puree the butter mixture, you need the herbs sooo small so they don't clog your injector.  Rinse your turkey and pat it dry.  Tie legs or tuck them under (mine was done for me when I opened the package, yay!)  And flip the wings under the bird.  Place it in your roasting pan (mine is non-stick which makes it soooo easy to clean!)Now its time to start filling your syringe and injecting your turkey!!
I recommend an injector like this:
Cajun Injector Deluxe Marinade Injector
So, fill your injector and start injecting your turkey, make sure to do a few in the legs and thighs, but the majority of it into the breasts.  Then generously cover your turkey with salt and pepper.  Fill the cavity with your left over herbs and slice the lemon and stick that in there too.  It will look like this:
 Now put your turkey, uncovered into a preheated 400 degree oven.  Cook at 400 for about 40 minutes and then turn heat down to 365.  I did not cover my turkey at all, but if you notice it starting to get too brown cover lightly with foil.  Now, here is the part that goes against everything I knew about roasting a turkey....resist the urge to baste!  Just let it go as is, that is how you are going to get the crispy skin that everybody (except me) loves!  And don't forget to get yourself an official turkey watcher:

Now, my bird cooked in about 3 1/2 hours for around 21 pounds.  Yours might take longer, you need a good thermometer to let you know when it is done.  You need the temp to reach 165 degrees.  Make sure you check the thigh as well as the breast.  When you have reached 165 take the turkey out of the oven and let it rest (don't cut into it!!!) for about 20 minutes.  This will allow the juices in the turkey to settle into the meat.  Then it is time to carve, I wish I had some special instructions for this part, but having a chef for a husband comes in handy :)
Look at the herbs in the meat, and how juicy the turkey is:
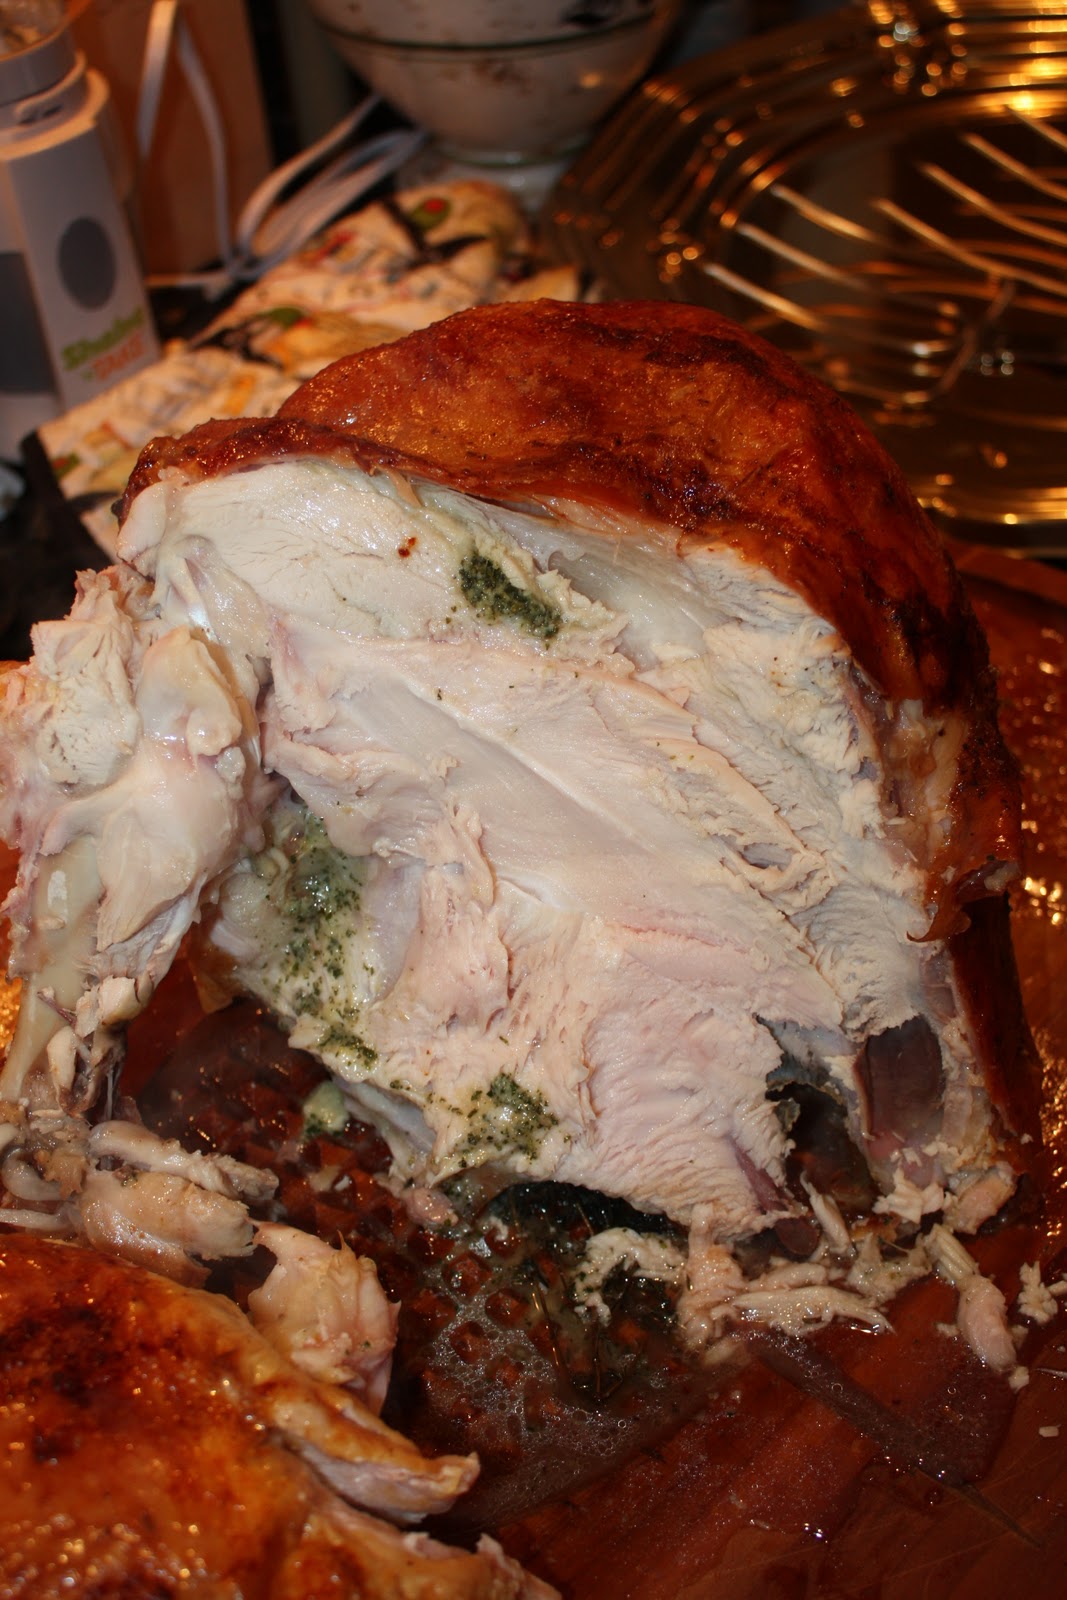
I hope you all enjoy this, and you can do the same thing with a chicken, just use less butter!

Friday, November 11, 2011

Pumpkin White Chocolate Chip Mini Cupcakes

Fine, I will admit it...I'm slightly obsessed with cupcakes.  I can't help myself, they are the perfect little size, quick to bake, so much fun to decorate and they are just cute!  So I find them to be my go-to dessert.  There are so many flavor options and I love how cupcakes make everyone smile!

I also don't make desserts at home (normally) out of fear that I might eat more than just one or two ;) so when I sign up to bring something to a bible study or party I almost always choose dessert!  This week I had a luncheon at bible study, so keeping with the Fall/Thanksgiving theme....pumpkin cupcakes!!  And, just to make them even more cute, I made minis!!

Ingredients:
1 2/3 cup all purpose flour
1 1/2 cup sugar
1/2 tsp baking soda
1 tsp baking powder
1/4 tsp salt
1/2 tsp nutmeg (freshly ground if possible)
1/2 tsp cinnamon
1/2 cup mini white chocolate chips
1 1/2 tsp vanilla
1/3 cup butter, melted
1 cup pumpkin puree (I used canned, but fresh would also work)
1/3 cup water
2 eggs

For the frosting:
1 8oz package cream cheese, room temp
1 stick butter, room temp
2 tsp vanilla
4 cups powdered sugar

Start by mixing flour, sugar, baking soda, baking powder, salt, nutmeg, cinnamon and white chocolate chips.  In a separate bowl combine wet ingredients: vanilla, melted butter, pumpkin, water and eggs.  Slowly add the wet ingredients into the dry and mix until combined (don't over mix!)  The batter is thick.  Now drop into lined cupcake pans.  I made mini cupcakes, so about a teaspoon of batter per cup was perfect.  Bake at 350 degrees for about 14 minutes for mini cupcakes (if you make regular size cupcakes probably about 22 minutes).  Check them by inserting toothpick, it should come out clean.  Allow cupcakes to cool completely before frosting.  If you make them the night before and aren't frosting until the morning it is important to cover them or they might dry out.  Just line them up on cookie sheet and cover with plastic wrap.

For the frosting.  Beat butter and cream cheese until combined and smooth.  Then add in vanilla.  Continue mixing adding in 1 cup of powdered sugar at a time until it is all mixed in.  You can add milk (or water) to thin out frosting if you desire. 

I decorated my cupcakes by putting my frosting in a pastry bag with a large star tip (Wilton 1M) and I pipped a large star on each cupcake.  It took me about 3 minutes to frost all 50 mini cupcakes!  Enjoy!

Thursday, November 3, 2011

Celery Root Soup

About a week ago I was on my way to the store and Casey was home watching the kids...pure bliss!  Grocery shopping with 3 little ones is sometimes a bit chaotic, so when I have the chance to go all by myself I go!  He called me and asked me to buy some heavy cream and celery root so he could make some soup.  I obliged, and then he ran out of time to make it :( So I decided to try and make it myself tonight!

This soup is really delicious.  It has almost a potato soup consistency and tastes really fresh!  I didn't make this soup until after my kids had already had dinner, but when it was done they were all standing around begging for tastes!  This is a really simple soup to make, and is sure to impress!

Celery Root was in my grocery store, but mislabeled as Beet Root.  The poor cashier didn't know what to do when it was ringing up wrong and eventually decided to just charge me $0.50 for it!  It is cheap, but probably not that cheap!! 
Here is a picture of it:
Here is what you need:
4 tablespoons butter
1 large onion, chopped
3 ribs celery, chopped (I try to use the leafy inside ribs and throw the leaves in too!)
2 garlic cloves, chopped
1 bay leaf
Salt & Pepper (if you have white pepper use that)
1 large celery root, peeled and chopped into 1 in cubes
4 cups chicken stock
1/2 cup heavy cream

Start by melting butter in large pot.  Add in onion, celery, garlic and bay leaf and saute on med/low heat.  Season with salt and pepper.  You want the veggies to become translucent not browned.  Once they are cooked add in celery root and turn up heat.  Saute celery root pieces for about 2 minutes and then cover with chicken broth and put the lid on your pot.  Return heat to low and simmer for about 20 minutes or until you can easily insert a fork through celery root.  Remove bay leaf.  Now its time to puree your soup.  A stick blender will work, but to get the smoothest consistency use your blender.  Because your soup is very hot make sure to do small batches and be careful when removing lid that you don't burn your self.  Once all the soup is pureed and smooth, return to pot and stir in your cream.    Your soup is ready!

Tuesday, November 1, 2011

Chili!!

One of my favorite things to eat (especially when I am pregnant!) is CHILI!!  I have tried making it using all kinds of seasonings and different packets but a couple of years ago I found my favorite, Carroll Shelby's Chili Kit!  They are nice enough to put a recipe on the back of the box, but of course I do it differently.  In an attempt to make a more healthy chili I made it without meat, and it was so good I have never gone back.  Now, for some of you chili without meat is like blasphemy!  So, this chili is super yummy with ground beef (turkey) or shredded beef as well :)

Here is what you need:
2 tablespoons olive oil
1 large onion, chopped
3 celery ribs, chopped
1 red (or any color) bell pepper, chopped
1 poblano pepper, chopped
3 garlic cloves, chopped
Carroll Shelby's Chili Kit
1 28 oz can diced tomatoes
3 cups water
1 can kidney beans, drained and rinsed
1 can garbanzo beans, drained and rinsed
Optional: sour cream, cheese, chips to garnish!

So I start by chopping all my ingredients and putting them in a hot pan with 2 tablespoons oil.  Sweat the veggies, while they are cooking add in your entire salt packet and however much of the cayenne pepper packet you would like.  I make this for my whole family and I use the entire packet, but my 2,3 and 5 year old boys are ok with a little spice.  Use your discretion.  As the veggies soften add in the spice packet and then the tomatoes and water.  Stir and let simmer for about 5 minutes.  If you like a thicker chili (like I do!) mix the masa packet with 3 tablespoons water and add the mixture into the chili.  This needs to simmer for a good 20 minutes to allow the flavors to combine and the chili to thicken.  After the 20 minutes are up, stir in your kidney and garbanzo beans and cook until they are heated through (about 2 minutes).  Now, your chili is ready to eat!!!


If your kids are a little weary on the idea of chili try presenting it like this to get their attention!  A little cheese, sour cream and surrounded by tortilla chips!!

Thursday, October 27, 2011

Homemade Oreo Cookies

I have seen a few people blog or talk about making homemade oreos lately.  I think this is such a cute idea!  When my son Connor had sign ups for the Harvest Party at school I signed up to bring a surprise dessert and oreos were the surprise!!

I didn't have a recipe so I just kinda made it up as I went and the cookies were soooo good!  I used orange food coloring for the frosting to give a pumpkin look, but these would be so cute in any color!  Red and Green for Christmas, pink or blue for a baby shower, or any color for any occasion!

The cookies were hard the day that I made them, which was perfect for an oreo-like cookie, but the next day they were softer and a little chewy which (to me!) made them even more yummy!!


The recipe:
For the cookie:
1 1/4 cup flour
1/2 cup cocoa powder
1 tsp. baking soda
1/4 tsp. baking powder
a pinch of salt
1 1/4 cup sugar
1 and 1/4 sticks of butter, room temp
1 large egg

For the filling:
1 stick butter, room temp (could use Crisco, but butter tastes much better :)
2 cups powdered sugar
2 tsp vanilla
optional: food coloring of your choice! (I like to use the Wilton gels)

To make the cookie add all dry ingredients into your mixer and combine well on low.  Next add in the butter and then finally the egg.  This will make a stiff dough.  Make 1 inch balls from the dough and place on a parchment lined baking sheet.  Gently smoosh down the balls before baking.  Bake in a 350 degree over for 9 minutes.  They might appear underdone at 9 minutes, but they aren't...I promise :)  Cool cookies completely and pair them according to size!

Next make your filling.  Start by beating butter and then adding powdered sugar 1 cup at a time.  When fully combined add vanilla and mix some more!  Now you can add food coloring if you wish!

Now its time to assemble your cookies!  Put frosting into a piping bag and pipe about a teaspoon of filling on one of the paired cookies.  Then press them together.  Now you have a little cookie-frosting sandwich which resembles an oreo cookie...only it is so much better!!


I can't wait to use peppermint extract instead of vanilla at Christmas time to make peppermint-chocolate cookies!  YUMMY!

Tuesday, October 11, 2011

Creamy Chicken and Rice

Well, I have been missing for a while.  I didn't mean I stopped cooking, I have just been so crazy busy!   I am about 3 1/2 months pregnant with our 4th baby which means when I am not feeling nauseous I am EXTREMELY tired, so that means no energy to blog :(  The good news is my first blog back is a recipe that is soooo easy even my mom might try to make it! (She thinks my recipes are too hard or involved and doesn't normally try them :(  I promise, everything I put on here anyone can make!!)

Anyway, onto the food!!  This is so easy and so yummy!  I hope you enjoy it as much as my family did!!

Ingredients:
3 chicken breasts, cut into 1 inch cubes
3 tablespoons herb de provence (or italian type seasoning)
Salt & Pepper
2 tablespoons butter
2 tablespoons olive oil
1 8 oz package of cream cheese, also in cubes
1 can cream of chicken soup
3 tablespoons milk
about 1/4 cup thinly sliced green onions
Cooked long grain rice for serving!

First lay out your cubed raw chicken and toss with salt, pepper and herbs de provence.  In a saute pan melt butter and oil and heat up.  When the oil is hot add your chicken cubes (the hot oil will help the chicken not to stick!)  Stir when necessary to brown each side of chicken, it may still be raw inside.  Next add in your cream cheese, stirring to melt it along with your cream of chicken soup.  Stir until mixed together, it will be thick so add in your milk!  Just before serving stir in your green onions!  This will add a little crunch and fresh taste to your dinner.  Serve creamy chicken over rice and enjoy :)

Saturday, August 20, 2011

Chocolate Rolo Cookies

I love Rolos!  What's not to love?  Chocolate, carmel, soft, chewy...DELICIOUS!!  We were just at a wedding and the dessert table had these cute little boxes filled with Rolos, I had forgotten how much I loved Rolos!!  So yummy!  Then just a week later I saw a blog being featured that made a Rolo cookie using cake mix.  I thought they sounded so yummy, but would be even better with a soft, almost chewy, chocolate cookie recipe I have.  I knew I couldn't just make them for fun out of fear that I would eat the entire batch so I have been waiting to try them.  Today was the day!  I was in charge of bringing a dessert to a MOPS meeting, and I brought...you guessed it!  ROLO COOKIES!!

Ingredients:
2 1/2 cups all purpose flour
1 teaspoon baking soda
1/4 teaspoon salt
3/4 cup unsweetened cocoa powder
1 cup butter, at room temp
1 cup sugar
1 cup brown sugar
2 eggs
2 teaspoons vanilla
Rolos (about 32 unwrapped)

Preheat your oven to 375 and prepare two cookie sheets with parchment paper or silpat.

Start by sifting the flour, baking soda, salt and cocoa powder (I NEVER sift, but your supposed to :)  Set bowl aside and mix your wet ingredients.  Cream the butter and the sugars.  Next add in the eggs, one at a time, until fully combined.  Then the vanilla.  Now its time to slowly add in the dry ingredients, about 1/2 cup at a time.  Once its all combined (make sure you scrape the sides of your bowl!) its time to form the cookie balls!  Take just enough cookie dough to fully cover a rolo and then roll into a ball and put on your cookie sheet.  Continue until you have used all your dough/rolos.  Place on baking sheets, 12 at a time and place in preheated oven for 7-8 minutes.  They are still really soft when you take them out, but they firm up I promise :)  Then...EAT them!  They are delicious warm, or at room temp.  Enjoy, and try to not eat them all!