Saturday, April 13, 2013

Pancakes!!!

I am not a huge pancake lover, and because of this I don't really think to make them all that often.  Well, my boys DO like them and are starting to ask for them more and more.  So, I make them, and they LOVE them, and they ask me to make them almost every day!  I still limit it to Saturdays and special occasions...but today is Saturday so I am going to share my recipe for making pancakes! So easy, so yummy and I bet you have all of the ingredients in your pantry or fridge right now!  The following recipe makes about 18 pancakes, they store wonderfully in the fridge or freezer!

Pancakes
2 1/4 cup flour
1 1/2 TBL baking powder
1 1/2 TBL sugar
2 eggs
2 1/4 cups milk
1/2 stick butter, melted

Cherry Syrup
1 pound pitted cherries (I used a bag of frozen cherries, check ingredient list it should just say cherries...no sugar or anything added!)
1/4 cup water
1 TBL sugar
1/2 tsp lemon zest

In a mixing bowl mix flour, baking powder and sugar together.  Make a well in the center and put your eggs and milk in the well.  Stir together, just until combined...there will be lumps!  Finally pour in your melted butter and stir that in as well.  Now its time to cook them!  I like to use an electric griddle because its non-stick and easy!  The key to super fluffy pancakes is to cook them slowly and whatever you do DO NOT press them down with the spatula!!  I always have maple syrup in the house, but my favorite way to serve them is with a fresh fruit syrup/puree'!

While you are making your pancakes put all the ingredients for your cherry syrup in a saucepan and cook over high heat until cherries are boiling.  Now, put in a blender and blend until smooth (I used a stick blender which didn't get rid of all the cherry skin, a traditional blender will make it completely smooth!)  That's it!
 
PS.  Want to be a super cool mom and make SPRINKLE pancakes?!?!  I thought you might!  Just add in a handful of sprinkles to the flour mix before you add in the wet ingredients.  Then top with more sprinkles!  This is a great birthday treat, or way to celebrate special days!  Use red and green sprinkles at Christmas, red and pink for Valentine's Day, or even the colors for your kid's sports teams!  So fun!  Here is Braydon on his 5th birthday loving some sprinkle pancakes!!


Thursday, February 14, 2013

It's Valentine's Day!!!

Happy Valentine's Day!!  I have been busy and haven't blogged in a while.  I know I've said it before, but I will say it again...being a mom to 4 little boys is CRAZY {or if I was cool like the young kids I would say cray cray!}  I love it...but am constantly exhausted and constantly going!  It's all good though, because today I have 5 sweet Valentines to love on!

I joined in on a fun little Valentine's Swap and wanted to share what sweet Colleta from Colletta's Kitchen Sink sent me!  Alissa and Caroline hosted the swap and sent me Colletta's name, her blog info and some of her favorite things and I put together a fun little package for her and in return she sent a package to me!!  Getting fun mail is seriously one of my favorite things EVER!!  So when my package arrived I couldn't wait to tear it open!  She sent a comfy, cozy valentines throw with a heart pillow along with a love wax warmer!  So fun!  Thank you Colletta!!!

I tend to down play Valentine's Day because Braydon's birthday is the day before, my hubby always works and I'm in a house full of boys...BUT it has been so fun this year as I decided to embrace it!  The cozy throw has been snuggled by me with all my boys and the warmer has added a fun warmth to my mantel decorations!  Tonight I am going to take it easy for dinner, especially since Casey will be working anyway.  I know I share pasta dishes often, but lets face it kids LOVE pasta!!  I always put veggies in it and I figure if a little pasta will get them to eat the other stuff they can have pasta all the time!!

Lemon Broccoli Pasta
`1 pound short pasta
`3 cups broccoli florets {I prefer fresh but frozen works too!}
`3ish tablespoons olive oil
`Zest of 1 lemon
`Juice from 1/2 lemon
`1/4 cup parmesan cheese, plus more for serving
`Salt & Pepper

Boil your pasta according to the directions on the package in salted water.  3 minutes before the past is done add in your broccoli florets.  Drain pasta/broccoli and then return to pan.  Add olive oil and toss.  Next add lemon zest, lemon juice and parmesan cheese and fold it it.  Salt and pepper to taste.  Serve with freshly grated parmesan on top!  My boys can't get enough of this pasta, in fact my most picky eater calls me "the best mommy in the whole wide world!" when I feed him this dish!  Seriously delicious!

Friday, December 28, 2012

Christmas Family Time and Spinach, Artichoke Pasta

WOW!  I can't believe Christmas has come and gone and I have neglected my blog once again :(  BUT, I am so happy to say that while I was neglecting my blog I was living life to the fullest and enjoying the Christmas season with my hubby and sweet boys!!  We went to Christmas concerts, advent services, Jungle Bells at the San Diego Zoo, Breakfast with Santa, we shopped, baked cookies and so much more!  It is so much fun seeing the joy of Christmas through the eyes of my boys.  They LOVE Jesus and they sure do love celebrating His birth and all of the Christmas "perks" that go along with it!!

Holidays also mean lots of lonely nights being a chef's wife.  The restaurant is BUSY doing Christmas parties and entertaining guests on vacation.  It is so easy for me to become frustrated with his job and all that it entails, but this year was different.  Don't get me wrong, I still had my occasional "pitty party".   BUT, I really tried to focus on the time we were together rather than dwell on the time we were a part.  I think we drank hot chocolate and snuggled in Christmas jammies every night we were all home in December.  I had our fireplace going, candles lit and Christmas music playing almost every night.  This might seem like its obvious, but I don't know what makes me think I can't do this every day!  There is something about listening to music, especially Christian music, that just makes my heart happy!  I plan on continuing our December family time through the new year!

Here is a picture of my family on Christmas night! 


It wouldn't be a blog post without a recipe right?!?!  So, here is what I made last night!  The boys LOVED it and so did I :)

Spinach Artichoke Pasta
1 pound pasta, cooked according to directions in SALTED water (I used gemelli)
3 tablespoons olive oil
1 onion, sliced
3 garlic cloves, sliced or diced
1 can artichoke hearts, drained and chopped
1 pound frozen spinach, thawed and water squeezed out of it
1 lemon, zest and juice
1/4 cup freshly grated parmesan, plus more for topping
salt & pepper


Start by getting your pasta boiling.  While that is cooking heat up olive oil in a large skillet add in onions and garlic and season with salt and pepper.  Let that saute for a minute or 2 then add in the spinach and artichokes and saute until its all heated through.  At this point pasta will be cooked.  Drain and add cooked pasta to the pan with vegetables.  Add lemon zest and juice as well as parmesan and fold it all together.  Serve hot with grated parmesan on top!  There is something about the lemon in this pasta that makes it so delicious and kid friendly too!!

Tuesday, November 13, 2012

Be Generous!! Eat Lasagna!!

Hello blogging world!  How is everyone enjoying their Tuesday??  I started my morning off with MOPS (Mothers Of Pre-Schoolers).  It is always such a fun time, we have breakfast, hear from a speaker, do a craft and get to hang with other moms all while our kids are being smothered with love and having a BLAST.  Win Win in my book :)

Today our speaker spoke on teaching our kids to be generous.  WOW!  I was beyond moved.  I try to be generous in my day to day life, but I could do MORE and can definitely encourage my children to have a more generous spirit.  She really focused on 3 points: learn the way God has gifted your children to be generous, give them opportunities and encourage them to be generous and be an example of a generous person.  Honestly I never really thought about the fact that I need to teach generosity.  Of course,  I have taught them to share (which they do sometimes!), to love others, to pray for those less fortunate, etc...but I can't say that I have consciously taught them to be generous.  A lot of what she talked about was using their God-given gifts and letting them explore being generous through what God gave them.

I am inspired and motivated to put this into practice.  One way in which I am able to show generosity is through cooking.  I LOVE people, especially moms and what a better way to serve them than by making a meal for a family in need, or right after the birth of a baby, or just because life is hectic and a meal would bless their day!  One of my favorite meals to make for families is lasagna! 

What you need:
1 box lasagna noodles (the kind you HAVE to boil)
2 jars of your favorite tomato sauce (or homemade if you have on hand!)
32 oz container ricotta cheese
2 eggs, lightly beaten
4 cups grated mozzarella cheese
handful of basil, finely chopped
1/2 onion, diced
2 cloves garlic, minced
1/2 cup parmesan cheese
salt and pepper

Start by boiling a big pot of salted water! 


When boiling add in the lasagna noodles and cook according to the directions on the box.  In a small pan saute onion and garlic in a little olive oil for 2-3 minutes.  Put ricotta in a bowl and add in eggs, basil, onion/garlic combo and salt and pepper and combine.  When noodles are done drain and get your assembly line in order :) 


Then just layer your lasagna!  Start with a little bit of sauce on the bottom of a deep 13x9 baker, then lay out the noodles, next spoon a layer of ricotta over noodles, pour sauce over ricotta and then a layer of mozzarella.  Then noodles again and continue this process until your baking dish is full!  I do at least 4 layers.  Then sprinkle the parmesan cheese on top.

Cover with foil and put into a preheated 350 degree oven for about 45 mins (it needs to be heated thoroughly because of the egg).  Take off the foil and let the top get golden brown and bubbly for the last 3 mins.  IMPORTANT STEP!!  Once the lasagna is out of the oven let it sit for 10-15 minutes before you cut it!!  (oops.  apparently we were hungry and I didn't take a picture of the final product!)

**The above recipe will create a 13x9 lasagna, as well as an 8x8 or 9x9 lasagna.  Keep one for your family and be generous with the other :)


Thursday, November 8, 2012

Thankful...and pumpkin french toast!

Let me just start by saying I am soooo glad Halloween is over!!  I am so not a fan of ghosts, witches, skeletons, zombies and other ewey, scary stuff!  I feel like as soon as October (or even sooner!) starts I, as a mom, have to be on the look-out.  When we walk in to a party store, craft store, Target, etc there are images that my kids are scared of and things I just don't want in their little minds.  I'm constantly avoiding certain places or telling my kids to cover their eyes as we walk through.  Then, don't get me started on kid TV!  My "safe" shows for my kids are no longer safe and my kids don't understand why I won't let them watch certain things.

 Now, don't get me wrong, I LOVE dressing my kids up!  This year they were all superheroes: Captain America, Batman, Spiderman and Superman.  So cute, so fun!  THAT is what Halloween is about for me and my family, just a fun time to dress up and let my kids (and me) eat lots of candy!


Then, what happens November 1st?  It's like Fall is over.  Pumpkin patches are closed, pumpkins go on sale and stores move all their Fall stuff out in order to make room for Christmas!  Again, I am so excited for Christmas.  BUT, what about THANKSGIVING!?!?!?! 

I LOVE Thanksgiving, it is a time to reflect about how blessed I truly am.  I saw some others doing #novemberthankful on Instagram and decided to join in!  Every day during the month of November you post a picture of something you are thankful for.  It can be a full night of sleep, coffee, a picture showing God's grace, or anything in between.  What a great idea!  As much as I am looking forward to Christmas and the birth of my Savior I am going to take this time to be thankful every day and to remember that all of my blessings come from my Lord and Savior.  So, join me in keeping Fall alive a little longer and make my delicious pumpkin french toast below!

Pumpkin French Toast
1 loaf white bread (I used french toast bread)
3/4 cup pumpkin puree
1 cup milk
4 eggs, beaten
1 tsp vanilla extract
3/4 cup brown sugar
1 tsp cinnamon
1/2 tsp ground nutmeg
1/8 tsp salt
Maple syrup and powdered sugar for serving

In a shallow bowl (I use a pie plate) whisk all ingredients besides the bread.  When combined well, put bread in mixture to soak it up, make sure you turn so both sides are coated.  Heat a non-stick pan or griddle and lightly coat with butter or cooking spray.  Put pumpkin coated bread in pan and turn the heat to low/med-low.  Cook until nicely browned and then flip.  Cook until both sides are browned and serve with maple syrup and powdered sugar :)  This is super yummy and a great way to enjoy FALL!


Friday, November 2, 2012

How I'm feeling today.


Today is a different kind of day...I am feeling really melancholy and I'm feeling this strong desire to open up, be honest and share my soul with whoever will listen (or read).  I want my blog to be a little different than how it was in the past.  It will still have lots of recipes, but I want it to be about my life, kind of a memory book for my family.  I got that idea from reading my friend Ashlee's blog (you can read it here)!  She is a friend from high school, we recently reconnected and I LOVE reading about her family and her heart :)

So, these are the things on my heart today:

i wish i had a magic fairy that would do my dishes every day
true friendship is so precious
being the wife of a chef is lonely
my children bring me great joy
God is so FAITHFUL
being a mom is hard work
i wish Halloween candy counted as negative calories
i can't wait for sunday date night
God has a plan for my life that is different and better than what i could plan for myself

How are you feeling today??  Is your heart heavy??  Can you relate to my thoughts and feelings??  I would love to hear your thoughts! 

and for those of you hoping for a recipe...here is a super simple and yummy TREAT to pair with your favorite fruit...I did not create this recipe...I am stealing it from my mama...I hope she doesn't mind!

1 jar marshmallow cream
1 block cream cheese, softened
2 tsp. vanilla extract
1 tblsp. lemon zest

Whip all ingredients together and enjoy!  Seriously so good!

Sunday, October 28, 2012

BABY FOOD!!

When we had our first son I never even considered making baby food.  My hubby had other ideas...he made it known that it was ubber important to him that our baby be fed only the best!  Well, of course, I agreed I wanted him to have the best, so I would buy organic?!?  What ended up happening was me buying only the best, organic fruits and veggies and pureeing those to give him super wholesome and yummy food that were straight from my kitchen so I knew exactly what was in it...so salt, no sugar, no chemicals! 

I bought a couple of books and LOVED www.wholesomebabyfood.com and went to work!  Now that I am on baby #4 I have perfected my method and am able to fit baby purees into my regular kitchen time!  I am happy, Liam is happy and my chef is REALLY happy :)

This is what you will need:
big pot, with lid
blender
peeler
knife
ice cube trays with lids (or baby food freezer trays like this)
freezer gallon sized bags
fruit or veggie

I have pictures of making apples so I'll use those as my examples.  The first thing you want to do is wash your produce really well!  Then prepare for cooking.  I don't peel apples when I make them (except with Braydon I did because he would gag over the tiny specks of skin), so I just remove core and cube them and throw them in the pot!  I add a couple cups of water, you don't need to cover the apples, you need just enough that the bottom of the pot is covered and the water should go about an inch up from the bottom of the pot.

cutting up lots of gala apples
ready to cook!
 Cook on low/medium heat, covered, and stir occasionally until very soft.  Now its time to puree them!  Put in blender with a little bit of the cooking water.  Blend on high, taking time to stir the apples so the food gets fully pureed.  Depending on the strenght of your blender this might take some time :)  I normally blend for about a minute!  I also try and keep mine pretty thick( not chunky, but thick)!  Babies can handle thicker foods faster than you might think so I make mine thick and thin with water or breast milk at each feeding...that way you can get the consistency you need each time! 

*When pureeing HOT food remove lid slowly!  Contents have a tendency to pop!  Ouch!*

 Leave out enough food for that feeding and then transfer pureed food to ice cube trays, then put those in the freezer!  Once frozen, pop out cubes of food and transfer to gallon freezer bags and label with type of food and date you made it!  Each ice cube slot is normally an ounce, so when your baby is ready for a meal grab out however many cubes ounces you need! 

I normally make about 5 pounds of baby food, which will make 80 or more ounces of baby food (depending on how much water is used).  From start to putting it in the freezer it normally takes me about an hour and I make one new food each week, slowly adding to my collection.  Then I can also mix foods...grab 2 cubes of peas and 2 cubes of carrots, mix them together and its like a whole new food!  If you have a little one, why not give it a try?!?!  It doesn't take much time, is super healthy, saves a lot of money, and gives you a sense of accomplishment! 

This was a SUPER long post, I hope I didn't scare you off!!  Please let me know if you have any questions, or if your going to give it a try!  I love talking about cooking and I love talking about babies...put the 2 together and I'm a happy girl :)

Liam's 1st solid meal...SWEET POTATOES!

First Foods Cheat Sheet
Sweet Potatoes-peel, cube, steam, puree in blender
Pears- cube, steam in a little water, puree in blender
Peas- I buy frozen (make sure only ingredient is peas...a lot of companies add salt!), steam, puree
Apples- peel (or not, but there will be flecks of peel which some babies don't like), cube, steam, puree
Bananas- cook to order, (if brown just mash and serve) peel, microwave for 20 secs then mash
Avocado- must be soft, just mash and serve (can add water or breast milk to make creamy)
Green Beans- remove ends, steam, puree...for a long time :)
Acorn Squash- cut in half, remove seeds and lay cut down in baking dish, fill baking dish an inch up the side with water, cover with foil and bake at 350 for 45 mins or until soft, scoop out flesh and puree
Carrots- peel, chop, steam or boil, puree
Butternut Squash- same as acorn squash...see above!
Parsnips- peel, chop, steam or boil, puree
Peaches- chop, steam, puree
Pumpkin- same as acorn squash...see above!



Saturday, October 27, 2012

I'm BACK...Sort of :)

Well, its been about 11 months since I have shared my cooking with you all, and what a crazy 11 months it has been!!  I endured an extremely dificult and painful pregnancy and was rewarded with the most beautiful little bundle, Liam Matthew! 
4 days old :)

Being a mommy to 4 little boys and being the wife to a very busy chef has been so joyous and so CRAZY HARD!!  I am loving it and exhausted, basically all the time!  The hubs has become quite the celebrity making 5 tv apperances in the last 11 months, his restaurant was named one of the top 10 in Orange County and he has been BUSY!!  Cooking with a new little one has certainly added some challenges, but my goal remains the same: healthy, flavorful meals that I can find time to make and that my whole family will enjoy!

Well, since I'm here I might as well share what we had for dinner last night :). Super easy, super yummy and healthy too! 

Southwestern Chopped Salad

1 head iceberg lettuce, chopped 
2 tomatoes, diced
1 bell pepper, diced
2 ears of corn, corn removed
1 bunch cilantro, stems removed and roughly chopped
1 can black beans, rinsed thoroughly
1 avocado, diced
Handful crushed tortilla chips


For the dressing:
1 cup non-fat plain Greek yogurt
1 tablespoon mayonnaise
1 tablespoon taco seasoning
1 tablespoon ranch packet
2 tablespoons milk

Put all ingredients for salad in a large bowl.  In separate bowl whisk together ingredients for dressing.  Add dressing to the salad and toss.  
 
 
Stay tuned....tomorrow will be a blog all about making baby food!!   

Wednesday, November 23, 2011

TURKEY, TURKEY, TURKEY!!!!

Casey and I have been married for 6 1/2 years and I think he has worked every Thanksgiving since we have been married :(  It's a bummer, but such is the life of a chef.  His favorite holiday also happens to be THANKSGIVING!!  So, every year I make a Thanksgiving meal for our little family at home.  It started with just the 2 of us and its hard to believe next year there will be 6 of us!  I will admit, my first year making a turkey I was sooo intimidated.  I mean, turkeys are hard to cook, you want crispy skin, juicy meat, flavorful and looking good.  I will let you all in on a little turkey secret the restaurants are hiding from you.  When they make big thanksgiving meals many times they cook the breasts and thighs separately so that they can achieve the perfect temperature without drying out the meat and then they present one whole turkey to the table that is golden brown (that will probably not ever be eaten)!!  However, because I have an amazing chef at home, and I have had plenty of practice I have figured out how to make the most delicious moist turkey ever!!

 Ingredients:
Turkey, thawed (mine was about 21 lbs)
3 sprigs thyme
2 sprigs rosemary
3 sprigs sage
4 garlic cloves
1 lemon
1 pound of butter (4 sticks)
Salt and Pepper
Injector

So, first start by take 2 sprigs of thyme, 1 sprig of rosemary, 2 sprigs sage and remove leaves from stems.  Then finely chop.  Next chop garlic, and zest your lemon.  Melt the butter and add in chopped herbs, garlic and lemon zest.  Now use your blender (or a stick blender) to puree the butter mixture, you need the herbs sooo small so they don't clog your injector.  Rinse your turkey and pat it dry.  Tie legs or tuck them under (mine was done for me when I opened the package, yay!)  And flip the wings under the bird.  Place it in your roasting pan (mine is non-stick which makes it soooo easy to clean!)Now its time to start filling your syringe and injecting your turkey!!
I recommend an injector like this:
Cajun Injector Deluxe Marinade Injector
So, fill your injector and start injecting your turkey, make sure to do a few in the legs and thighs, but the majority of it into the breasts.  Then generously cover your turkey with salt and pepper.  Fill the cavity with your left over herbs and slice the lemon and stick that in there too.  It will look like this:
 Now put your turkey, uncovered into a preheated 400 degree oven.  Cook at 400 for about 40 minutes and then turn heat down to 365.  I did not cover my turkey at all, but if you notice it starting to get too brown cover lightly with foil.  Now, here is the part that goes against everything I knew about roasting a turkey....resist the urge to baste!  Just let it go as is, that is how you are going to get the crispy skin that everybody (except me) loves!  And don't forget to get yourself an official turkey watcher:

Now, my bird cooked in about 3 1/2 hours for around 21 pounds.  Yours might take longer, you need a good thermometer to let you know when it is done.  You need the temp to reach 165 degrees.  Make sure you check the thigh as well as the breast.  When you have reached 165 take the turkey out of the oven and let it rest (don't cut into it!!!) for about 20 minutes.  This will allow the juices in the turkey to settle into the meat.  Then it is time to carve, I wish I had some special instructions for this part, but having a chef for a husband comes in handy :)
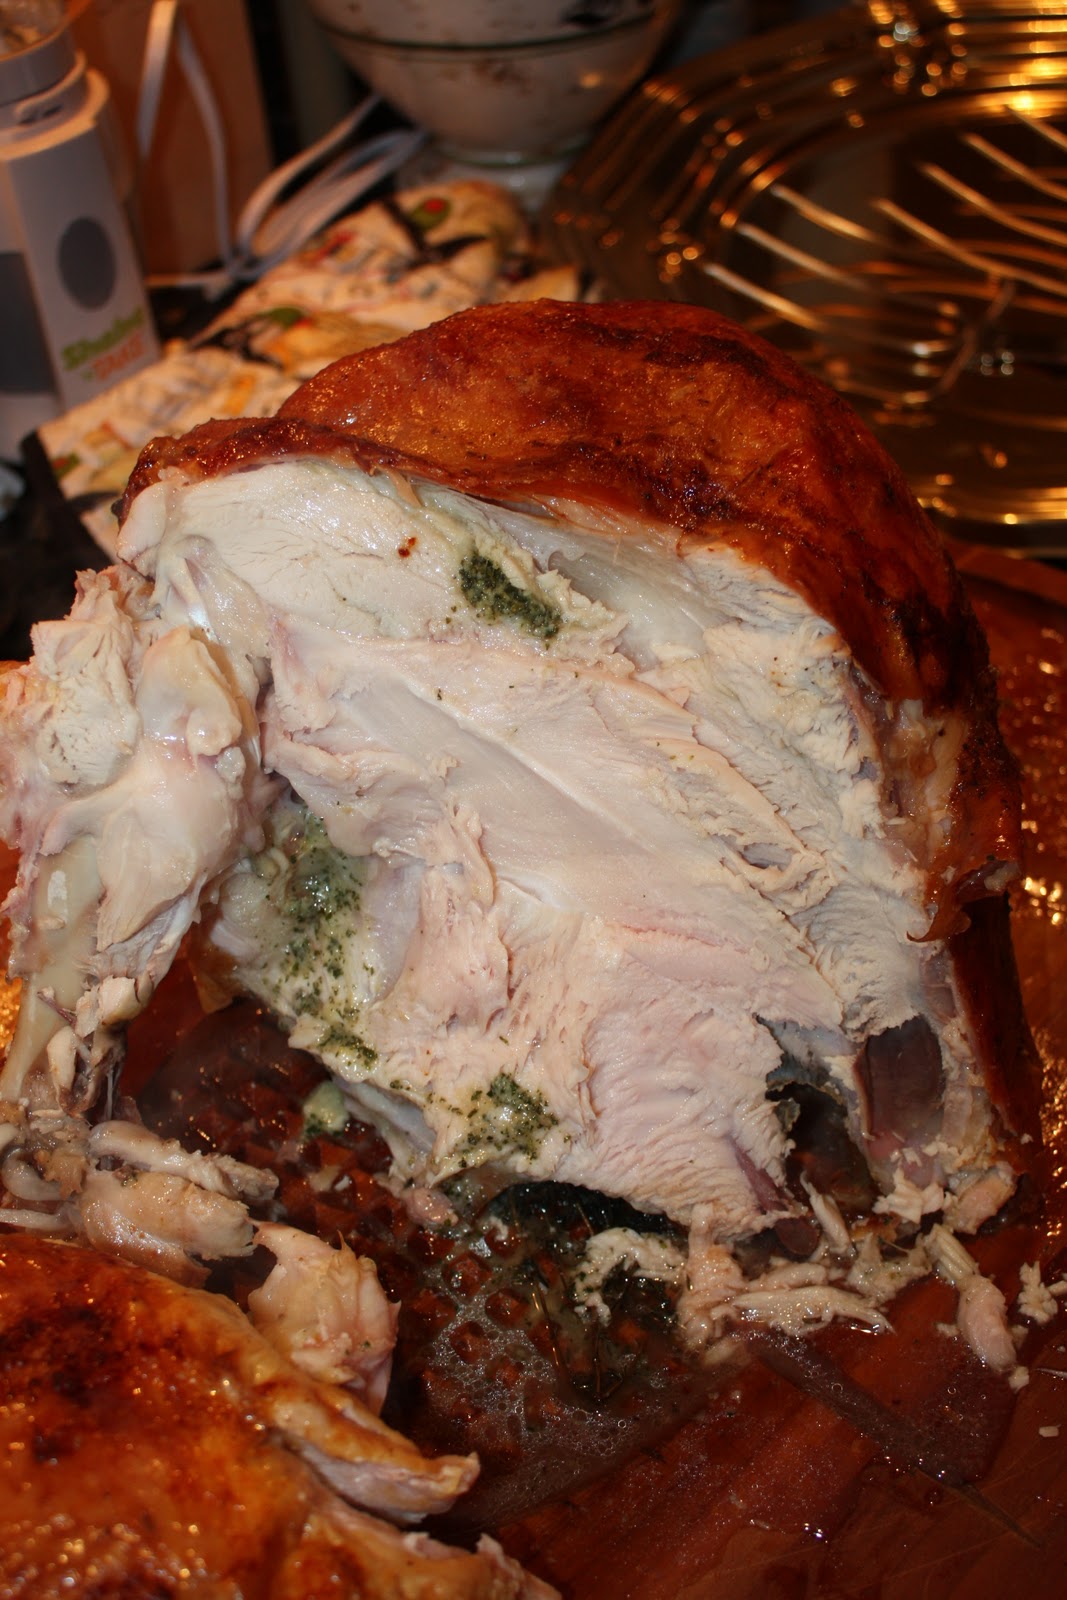
Look at the herbs in the meat, and how juicy the turkey is:
I hope you all enjoy this, and you can do the same thing with a chicken, just use less butter!

Friday, November 11, 2011

Pumpkin White Chocolate Chip Mini Cupcakes

Fine, I will admit it...I'm slightly obsessed with cupcakes.  I can't help myself, they are the perfect little size, quick to bake, so much fun to decorate and they are just cute!  So I find them to be my go-to dessert.  There are so many flavor options and I love how cupcakes make everyone smile!

I also don't make desserts at home (normally) out of fear that I might eat more than just one or two ;) so when I sign up to bring something to a bible study or party I almost always choose dessert!  This week I had a luncheon at bible study, so keeping with the Fall/Thanksgiving theme....pumpkin cupcakes!!  And, just to make them even more cute, I made minis!!

Ingredients:
1 2/3 cup all purpose flour
1 1/2 cup sugar
1/2 tsp baking soda
1 tsp baking powder
1/4 tsp salt
1/2 tsp nutmeg (freshly ground if possible)
1/2 tsp cinnamon
1/2 cup mini white chocolate chips
1 1/2 tsp vanilla
1/3 cup butter, melted
1 cup pumpkin puree (I used canned, but fresh would also work)
1/3 cup water
2 eggs

For the frosting:
1 8oz package cream cheese, room temp
1 stick butter, room temp
2 tsp vanilla
4 cups powdered sugar

Start by mixing flour, sugar, baking soda, baking powder, salt, nutmeg, cinnamon and white chocolate chips.  In a separate bowl combine wet ingredients: vanilla, melted butter, pumpkin, water and eggs.  Slowly add the wet ingredients into the dry and mix until combined (don't over mix!)  The batter is thick.  Now drop into lined cupcake pans.  I made mini cupcakes, so about a teaspoon of batter per cup was perfect.  Bake at 350 degrees for about 14 minutes for mini cupcakes (if you make regular size cupcakes probably about 22 minutes).  Check them by inserting toothpick, it should come out clean.  Allow cupcakes to cool completely before frosting.  If you make them the night before and aren't frosting until the morning it is important to cover them or they might dry out.  Just line them up on cookie sheet and cover with plastic wrap.

For the frosting.  Beat butter and cream cheese until combined and smooth.  Then add in vanilla.  Continue mixing adding in 1 cup of powdered sugar at a time until it is all mixed in.  You can add milk (or water) to thin out frosting if you desire. 

I decorated my cupcakes by putting my frosting in a pastry bag with a large star tip (Wilton 1M) and I pipped a large star on each cupcake.  It took me about 3 minutes to frost all 50 mini cupcakes!  Enjoy!

Thursday, November 3, 2011

Celery Root Soup

About a week ago I was on my way to the store and Casey was home watching the kids...pure bliss!  Grocery shopping with 3 little ones is sometimes a bit chaotic, so when I have the chance to go all by myself I go!  He called me and asked me to buy some heavy cream and celery root so he could make some soup.  I obliged, and then he ran out of time to make it :( So I decided to try and make it myself tonight!

This soup is really delicious.  It has almost a potato soup consistency and tastes really fresh!  I didn't make this soup until after my kids had already had dinner, but when it was done they were all standing around begging for tastes!  This is a really simple soup to make, and is sure to impress!

Celery Root was in my grocery store, but mislabeled as Beet Root.  The poor cashier didn't know what to do when it was ringing up wrong and eventually decided to just charge me $0.50 for it!  It is cheap, but probably not that cheap!! 
Here is a picture of it:
Here is what you need:
4 tablespoons butter
1 large onion, chopped
3 ribs celery, chopped (I try to use the leafy inside ribs and throw the leaves in too!)
2 garlic cloves, chopped
1 bay leaf
Salt & Pepper (if you have white pepper use that)
1 large celery root, peeled and chopped into 1 in cubes
4 cups chicken stock
1/2 cup heavy cream

Start by melting butter in large pot.  Add in onion, celery, garlic and bay leaf and saute on med/low heat.  Season with salt and pepper.  You want the veggies to become translucent not browned.  Once they are cooked add in celery root and turn up heat.  Saute celery root pieces for about 2 minutes and then cover with chicken broth and put the lid on your pot.  Return heat to low and simmer for about 20 minutes or until you can easily insert a fork through celery root.  Remove bay leaf.  Now its time to puree your soup.  A stick blender will work, but to get the smoothest consistency use your blender.  Because your soup is very hot make sure to do small batches and be careful when removing lid that you don't burn your self.  Once all the soup is pureed and smooth, return to pot and stir in your cream.    Your soup is ready!

Tuesday, November 1, 2011

Chili!!

One of my favorite things to eat (especially when I am pregnant!) is CHILI!!  I have tried making it using all kinds of seasonings and different packets but a couple of years ago I found my favorite, Carroll Shelby's Chili Kit!  They are nice enough to put a recipe on the back of the box, but of course I do it differently.  In an attempt to make a more healthy chili I made it without meat, and it was so good I have never gone back.  Now, for some of you chili without meat is like blasphemy!  So, this chili is super yummy with ground beef (turkey) or shredded beef as well :)

Here is what you need:
2 tablespoons olive oil
1 large onion, chopped
3 celery ribs, chopped
1 red (or any color) bell pepper, chopped
1 poblano pepper, chopped
3 garlic cloves, chopped
Carroll Shelby's Chili Kit
1 28 oz can diced tomatoes
3 cups water
1 can kidney beans, drained and rinsed
1 can garbanzo beans, drained and rinsed
Optional: sour cream, cheese, chips to garnish!

So I start by chopping all my ingredients and putting them in a hot pan with 2 tablespoons oil.  Sweat the veggies, while they are cooking add in your entire salt packet and however much of the cayenne pepper packet you would like.  I make this for my whole family and I use the entire packet, but my 2,3 and 5 year old boys are ok with a little spice.  Use your discretion.  As the veggies soften add in the spice packet and then the tomatoes and water.  Stir and let simmer for about 5 minutes.  If you like a thicker chili (like I do!) mix the masa packet with 3 tablespoons water and add the mixture into the chili.  This needs to simmer for a good 20 minutes to allow the flavors to combine and the chili to thicken.  After the 20 minutes are up, stir in your kidney and garbanzo beans and cook until they are heated through (about 2 minutes).  Now, your chili is ready to eat!!!


If your kids are a little weary on the idea of chili try presenting it like this to get their attention!  A little cheese, sour cream and surrounded by tortilla chips!!

Thursday, October 27, 2011

Homemade Oreo Cookies

I have seen a few people blog or talk about making homemade oreos lately.  I think this is such a cute idea!  When my son Connor had sign ups for the Harvest Party at school I signed up to bring a surprise dessert and oreos were the surprise!!

I didn't have a recipe so I just kinda made it up as I went and the cookies were soooo good!  I used orange food coloring for the frosting to give a pumpkin look, but these would be so cute in any color!  Red and Green for Christmas, pink or blue for a baby shower, or any color for any occasion!

The cookies were hard the day that I made them, which was perfect for an oreo-like cookie, but the next day they were softer and a little chewy which (to me!) made them even more yummy!!


The recipe:
For the cookie:
1 1/4 cup flour
1/2 cup cocoa powder
1 tsp. baking soda
1/4 tsp. baking powder
a pinch of salt
1 1/4 cup sugar
1 and 1/4 sticks of butter, room temp
1 large egg

For the filling:
1 stick butter, room temp (could use Crisco, but butter tastes much better :)
2 cups powdered sugar
2 tsp vanilla
optional: food coloring of your choice! (I like to use the Wilton gels)

To make the cookie add all dry ingredients into your mixer and combine well on low.  Next add in the butter and then finally the egg.  This will make a stiff dough.  Make 1 inch balls from the dough and place on a parchment lined baking sheet.  Gently smoosh down the balls before baking.  Bake in a 350 degree over for 9 minutes.  They might appear underdone at 9 minutes, but they aren't...I promise :)  Cool cookies completely and pair them according to size!

Next make your filling.  Start by beating butter and then adding powdered sugar 1 cup at a time.  When fully combined add vanilla and mix some more!  Now you can add food coloring if you wish!

Now its time to assemble your cookies!  Put frosting into a piping bag and pipe about a teaspoon of filling on one of the paired cookies.  Then press them together.  Now you have a little cookie-frosting sandwich which resembles an oreo cookie...only it is so much better!!


I can't wait to use peppermint extract instead of vanilla at Christmas time to make peppermint-chocolate cookies!  YUMMY!

Tuesday, October 11, 2011

Creamy Chicken and Rice

Well, I have been missing for a while.  I didn't mean I stopped cooking, I have just been so crazy busy!   I am about 3 1/2 months pregnant with our 4th baby which means when I am not feeling nauseous I am EXTREMELY tired, so that means no energy to blog :(  The good news is my first blog back is a recipe that is soooo easy even my mom might try to make it! (She thinks my recipes are too hard or involved and doesn't normally try them :(  I promise, everything I put on here anyone can make!!)

Anyway, onto the food!!  This is so easy and so yummy!  I hope you enjoy it as much as my family did!!

Ingredients:
3 chicken breasts, cut into 1 inch cubes
3 tablespoons herb de provence (or italian type seasoning)
Salt & Pepper
2 tablespoons butter
2 tablespoons olive oil
1 8 oz package of cream cheese, also in cubes
1 can cream of chicken soup
3 tablespoons milk
about 1/4 cup thinly sliced green onions
Cooked long grain rice for serving!

First lay out your cubed raw chicken and toss with salt, pepper and herbs de provence.  In a saute pan melt butter and oil and heat up.  When the oil is hot add your chicken cubes (the hot oil will help the chicken not to stick!)  Stir when necessary to brown each side of chicken, it may still be raw inside.  Next add in your cream cheese, stirring to melt it along with your cream of chicken soup.  Stir until mixed together, it will be thick so add in your milk!  Just before serving stir in your green onions!  This will add a little crunch and fresh taste to your dinner.  Serve creamy chicken over rice and enjoy :)

Saturday, August 20, 2011

Chocolate Rolo Cookies

I love Rolos!  What's not to love?  Chocolate, carmel, soft, chewy...DELICIOUS!!  We were just at a wedding and the dessert table had these cute little boxes filled with Rolos, I had forgotten how much I loved Rolos!!  So yummy!  Then just a week later I saw a blog being featured that made a Rolo cookie using cake mix.  I thought they sounded so yummy, but would be even better with a soft, almost chewy, chocolate cookie recipe I have.  I knew I couldn't just make them for fun out of fear that I would eat the entire batch so I have been waiting to try them.  Today was the day!  I was in charge of bringing a dessert to a MOPS meeting, and I brought...you guessed it!  ROLO COOKIES!!

Ingredients:
2 1/2 cups all purpose flour
1 teaspoon baking soda
1/4 teaspoon salt
3/4 cup unsweetened cocoa powder
1 cup butter, at room temp
1 cup sugar
1 cup brown sugar
2 eggs
2 teaspoons vanilla
Rolos (about 32 unwrapped)

Preheat your oven to 375 and prepare two cookie sheets with parchment paper or silpat.

Start by sifting the flour, baking soda, salt and cocoa powder (I NEVER sift, but your supposed to :)  Set bowl aside and mix your wet ingredients.  Cream the butter and the sugars.  Next add in the eggs, one at a time, until fully combined.  Then the vanilla.  Now its time to slowly add in the dry ingredients, about 1/2 cup at a time.  Once its all combined (make sure you scrape the sides of your bowl!) its time to form the cookie balls!  Take just enough cookie dough to fully cover a rolo and then roll into a ball and put on your cookie sheet.  Continue until you have used all your dough/rolos.  Place on baking sheets, 12 at a time and place in preheated oven for 7-8 minutes.  They are still really soft when you take them out, but they firm up I promise :)  Then...EAT them!  They are delicious warm, or at room temp.  Enjoy, and try to not eat them all!


Sunday, August 7, 2011

Lemon and Green Onion Orzo

Tonight I was late on figuring out dinner...oops!  So I had to look at what I had and quickly whip something up!!  I decided on cilantro, grapefruit pork chops, bbq'ed bell peppers and some orzo.  The bell peppers were just tossed with olive oil and salt and pepper and thrown on the grill till they were charred and a little soft...SUPER easy!  I will share a quick and easy marinade post soon which will include the cilantro grapefruit.  For tonight I will share with you the orzo!  It is simple, tastes so bright and fresh and is really sooo delicious!

Here is what you need:
1 lb box of orzo (its a little pasta, shaped like rice but a bit bigger)
1 tablespoon butter
1 tablespoon olive oil
3 green onions, thinly sliced
1 lemon, just the zest
1/4 cup freshly grated parmesan cheese
Salt & Pepper

Start by boiling a pot of very salty water.  Toss in the pasta and allow to cook per the boxes directions, normally around 9 minutes.  When pasta is ready strain well.  Put pasta back in pot and stir in butter and olive oil.  Next add in the green onion and lemon zest.  Once combined add the parmesan cheese!  Once this is all together taste and add salt if needed and some fresh grated pepper!  That's it! 

****Fun hint:  This is a great cold pasta salad as well!!  If you are going to serve it cold rinse pasta with cool water after it is cooked and before you add the other ingredients.  I'm not sure why this works (does something to the starch in the pasta) but my hubby taught me to do it, so I do!!

Saturday, August 6, 2011

Garden Tomato Pasta

So I have said it over and over my family LOVES pasta and I make it often because I can put almost any veggie with it and my little boys eat it all up!!  With all the tomatoes coming in from my mother-in-law's garden I needed to make some new pasta dishes other than just the regular old pureed tomato sauce!  Here is the recipe for my current favorite!  Casey said it was the best pasta dish I had ever made for him...but it was midnight and he was starving!  I hope you have some fresh tomatoes at your house or can get some because right now they are delicious and you just can't beat the homegrown taste :)

Ingredients:
1 onion, chopped
3 cloves garlic, sliced
4 cups (about) chopped tomatoes
1 cup torn basil leaves, plus a little more for garnish
3 tablespoons olive oil
salt and pepper
1/2 lb angel hair pasta
Freshly grated Parmesan cheese (or the good old green can if your in a bind :)

Start by turning the pan on high and adding the oil.  Also, fill a large pot with water and salt it to taste like the ocean.  Turn on high heat and wait for it to boil.  To the saute pan with hot oil add onions.  Stir around for about 2 minutes, you want them to cook but not get too brown.  Season well with salt and pepper!  Turn heat to medium and add in garlic.  Cook, stirring occasionally until the garlic becomes soft.  Your pot of water will probably boil by now so add in angel hair pasta and cook according to the directions on the box...mine said 4 minutes.  When pasta is done strain.  Turn saute pan's heat to low and stir in tomatoes and basil.  Cook on low for about 5 minutes.  The juices from the tomatoes will come out and you want all the ingredients to melt together.  My tomatoes are super sweet so there is a really great balance to the sauce.  Then your sauce is done!  Add in the angel hair and use tongs to toss the pasta with the sauce completely.  Use Parmesan cheese and a little fresh basil to garnish and you are ready to enjoy!
The sauce
Fresh, beautiful and delicious! 

Chocolate Filled Peanut Butter Cupcakes

When it's time for the chef's birthday  I am always trying to out-do last year's cake.  I want to make something he loves and something that is so good he looks forward to it all day!  So, I took my hubby's love for Reese's Peanut Butter cups and turned it into some awesome cupcakes!!

Ingredients:
1 box chocolate cake mix, plus ingredients called for on box

For Filling:
1 stick butter, softened
1 cup smooth peanut butter
1/2 cup powdered sugar
1/4 cup graham cracker crumbs

For Frosting:
2/3 cup softened butter
3/4 cup peanut butter
1 tsp vanilla extract
4 cups powdered sugar
about 4 TBL milk

Start by making your filling.  Add all ingredients together and stir together well!  This will need to sit in the fridge for an hour or more so it can harden (mine was in the fridge overnight).  Then mix chocolate cake according to the box.  Line your cupcake tins and put in one tablespoon of the chocolate cake batter into each.  Now, get your hardened peanut butter filling from the fridge and shape into 24 little balls. They are pretty gooey, but below you can see what your going for.

Now place a peanut butter ball into each of the tins.


Next fill cupcake tins with remaining batter.  The peanut butter will be completely covered.  Put into a 350 degree oven and let them bake.  I normally put them in for about 4 minutes less than what the box says.  They need to be cooked but you want them to be moist and delicious so DON'T OVERCOOK THEM!!  Now, let them cool completely before adding the frosting!
For the frosting start by mixing the softened butter and the peanut butter until smooth.  Next add the vanilla extract and add in the powdered sugar one cup at a time and allowing for the sugar to be fully combined before adding the next cup.  The frosting will be pretty thick...this is where the milk comes in!  Add milk a teaspoon at a time, mixing well in between, until you reach the desired consistency.  I like the look of piped on frosting, or you can spread it on, whatever you prefer!  Now, enjoy!!  If you aren't going to eat them for a while I would put them in the fridge, but allow them to sit on the counter for 30 minutes or so before eating so the frosting and filling can soften up!
This is the finished product!
Here is what the inside looks like!!

Thursday, July 28, 2011

Grilled Tomato Skewers

If you are friends with me on facebook I'm sure you have seen the pictures of my boys and I picking tomatoes from my mother-in-law's garden!  She has CRAZY amounts of tomatoes, I have never seen anything like it.  We pick hundreds at a time and there are still a ton left!  So with all these tomatoes around the house I have come up with some tasty ways to enjoy them!  Today, I just have a couple of minutes so I will share a quick recipe that is as easy as they come, but look beautiful for your family dinner at home or your next party!  I hope you try these, they are super yummy!!

What you need:
Skewers
Cherry tomatoes
Olive Oil
Salt&Pepper
Smoked Paprika

In a large bowl combine tomatoes, olive oil, salt, pepper and paprika.  Toss until the tomatoes are well coated.  Now, its time to skewer the tomatoes.  I try to have tomatoes that are the same size on each skewer, but will mix different varieties. If you have a tomato that is much larger than the others, that one will get grilled but it will prevent the smaller tomatoes from reaching the grill.  Place on a well heated grill and turn while cooking to get some beautiful grill marks on all sides of the tomatoes.  Let them cook until the tomatoes start to pop!  Then they are ready to eat!  These are perfect on their own, or to be removed and stirred into a rice or pasta dish.  Enjoy!

Thursday, July 14, 2011

Jambalaya

Tonight I made a jambalaya simple enough for a busy mom, yet tasty enough for a chef!  That is always my goal when cooking, big flavors, tasty ingredients and easy :)  One of the best things we did when planting out back was to put in a Laurel Tree, there is a never ending supply of bay leaves!!  I just send out the boys and say I need a cooking leaf and they pick it and throw it in the pot.  It adds so much flavor...yum!
There are tons of recipes out there fr jambalaya, this is what I came up with  a while back from researching other recipes.  I hope you enjoy it!

Ingredients:
1 onion, diced
1 bell pepper (any color...I used green today), diced
3 ribs celery, sliced
2 garlic cloves, chopped
2 bay leaves
1/4 teaspoon cayenne pepper
1/2 teaspoon smoked paprika
8 oz andouille sausage, sliced
3/4 cup long grain rice
3 cups chicken stock
Salt & Pepper
2 tablespoons olive oil

Start with your olive oil in a pan and turn heat to high.  Add in onion, celery and bell pepper and saute until caramelized and they start to get soft.  Add in garlic and continue to saute.  Season with salt and pepper, also add in bay leaves, cayenne and paprika.  Make sure it is combined well and stir in sausage and rice, cook for about a minute and then add chicken stock.  reduce heat to medium and cook for about 20 minutes, stirring occasionally.  Then when liquid is absorbed and rice is tender you are ready to eat!!